
At the control site, there are multiple setup steps required. It starts with the way you bring up WriteLog.
The installer now puts a second, separate icon on the desktop labeled WriteLog Control Site:
Instead of using the normal WriteLog V12 icon, you use the one with the violet lightning bolt. It starts by displaying the usual WriteLog startup screen offering to open an existing log or create a new one. Note that the logged QSOs at the control site are not connected to those at the remote. In fact, the remote need not have any QSOs or even a contest module loaded. The remote install is used only to control the rigs and other hardware.
Once you OK the WriteLog startup screen, the control site puts up this screen. It is where the your connection options are entered.
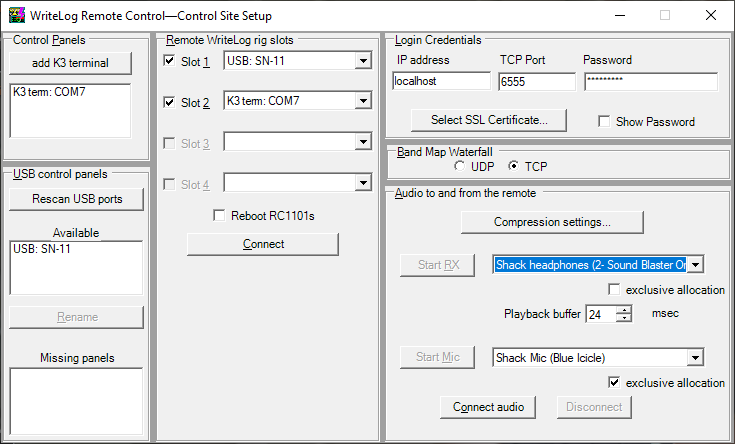
The top right panel is where you enter the password, port number and encryption key certificate that came from the remote site setup. Then there is the IP address to figure out.
localhost
The example above shows “localhost” which means connect to the WriteLog remote install on the same machine I am running the control. That is not very useful for operating your station, but it is helpful for testing. The control site and remote site WriteLog screens in this configuration both are on one PC at the same time and you can see what happens at the remote when you do something at the control. You may even specify the same Mic and headphone devices here as in WriteLog’s Sound board mixer as the Connect process releases the devices at the remote before it allocates them at the control, which works fine even if both remote and control are the same PC.
Understand, however, that while the WriteLog remote station is attached from a control site, is not intended to be used. Changes you make at the remote are not automatically reflected back to the control site in the same way that commands at the control site immediately make the remote respond.
Band Map Waterfall
UDP is the recommended setting here, unless you have a reason to keep the waterfall data on the encrypted TCP channel. WriteLog does not encrypt its UDP transfer, but the advantage of using UDP is the large waterfall data transfer rate won’t interfere as much with rig control.
On your home network
To connect from a PC within your home network, there is no need for dynamic DNS, but you do have to figure out what your home router has named the remote site PC (or figure out its IP address.) One way is to use the Windows start menu on your shack PC (the “remote site”) to start a command window (type “CMD” and the ENTER key.) In the DOS window that appears, type in the command “IPCONFIG” and then the ENTER key. Look for a line that looks like this:
IPv4 Address. . . . . . . . . . . : 192.168.73.101
In my case, then, a laptop on my home network with WriteLog installed can connect to 192.168.73.101.
Dynamic DNS
To connect from outside your home network into your remote controlled station, you must not only configure your router to forward the two port numbers (or three–for RTTY.) You must also do something to enable the control site to figure out what address on the internet to enter in this panel. There are many ways to do this and WriteLog Remote Control does not specify which of them you might use. W5XD uses and recommends the free service at http://noip.com.
See a later topic for an alternative to router port forwarding and dynamic DNS.
Two Connect buttons
There are separate Connect buttons for audio (on the right) and the one for everything else (in the “Remote WriteLog rig slots” panel.) Everything else means all these functions at the remote are taken over by the control site:
- Configuring the control site to operate the rigs at the remote
- CW transmission invoked by the control but sent by the remote
- The same for SSB wave file transmission. The Setup/CW-SSB-RTTY messages at the control site determine what is sent at the remote.
- Rotator control.
- RttyRite window remoting.
The audio connection is independent and can be started and stopped separately from everything else. Closing this WriteLog Control Setup dialog will, after a warning, stop all remote control and returns the remote to its normal operation.
This list of items for “everything else” is an important concept which I repeat. The control site WriteLog has all its DVK and CW transmission port setup options disabled. This Connect button is its only CW and DVK configuration. Whatever CW and DVK options as set up at the remote determine what hardware gets used. Clicking this Connect button causes the control site to take over the hardware configured at the remote.
Rig control setup has more options which I will elaborate in a later post.
Easiest way to know IP’s on a network is to turn off dynamic and just assign fixed IP’s.
When I created a new key on remote it didn’t ask for windows permission for rtty port access.
Once it all connected permission for rttyrite was asked for and granted.