
Remote Site Setup Ports
WriteLog remote control of rigs has several options to understand. Its setup begins back at the remote site.
Rig control architecture
Manufacturers publish serial port rig control protocol information and WriteLog (at either the control site or remote site) is configured with its Setup/Ports to control a rig that complies with the manufacturer’s documentation. WriteLog has done that since the early 1990’s.
WriteLog Remote Control executes that protocol at either the remote site or at the control site depending on how that particular rig’s remoting architecture is designed to work. You have to figure that out and do Setup/Ports on both WriteLog’s. Either way, the result is that the remote rig available to WriteLog Entry Windows at the control site as if it were local. This choice of which end to run WriteLog’s rig driver is separate for each radio in Setup/Ports. So if you have, for example, a FlexRadio and a K2 at the remote, the WriteLog at the Control Site Setup/Ports configures the Flex as a “local” rig because that is how WriteLog’s FlexRadio driver deals with remote rigs. But for the K2, the WriteLog at the remote site must configure the rig and the WriteLog at the control site controls the K2 through a “slot” as described below.
Setup the remote site first
The “1” in the lower left means pleast start with this screen.

The remote has to do nothing special for remote control. Here I have two rigs, a K3 and a K2 (on the top and second slots, respectively.) The K3 is additionally configured for SO2V as it appears on COM7 in two slots (numbers 1 and 3.) So far, remoting has not added anything complicated to understand. (Admittedly, it can be complicated to get all the Rig Types and baud rates, etc. set up properly for WriteLog regardless of remote control.) You probably already had Setup/Ports worked out to make WriteLog work at the remote, and the point is (to repeat) remote control requires no changes.
Now consider how to configure the control site to use these rigs.
Control Site startup settings
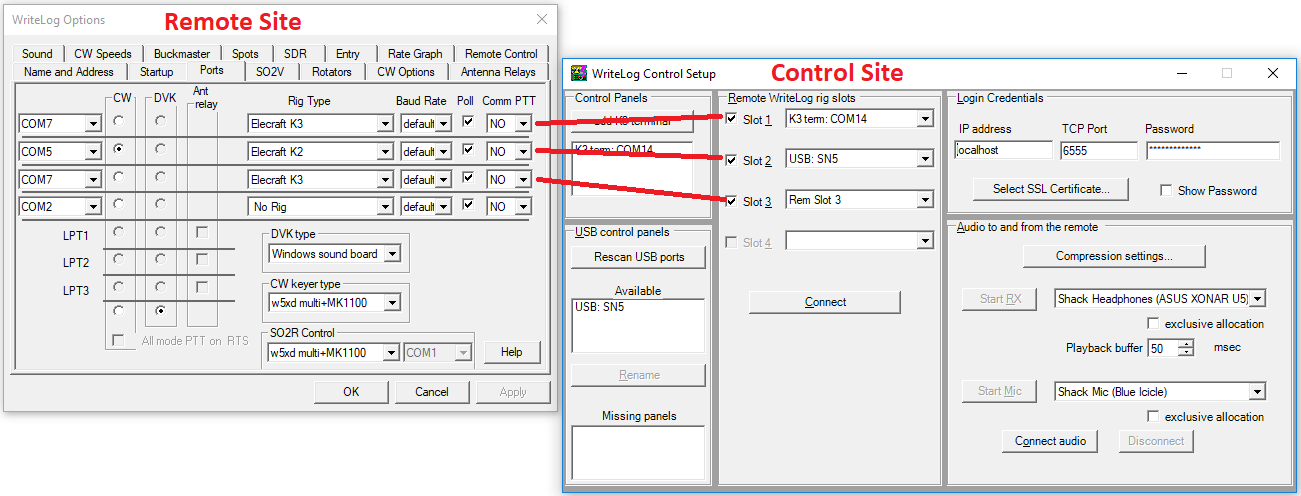
The slot numbers at the remote (with its #1 Setup/Ports display repeated from above) are significant in the Control Site setup page (shown as #2.) The red lines show the correspondence. The example here has Slot 1, 2, and 3 check boxes on, which makes all three slots in use at the remote site also available to Setup/Ports at the control site.
The entries you make in this WriteLog Control Setup’s “rig slots” column determine which of several techniques will be used to control the rigs at the remote. WriteLog Remote control supports four different settings, and each slot can be set to any of them, or left unchecked (therefore unavailable at the control site.) The available settings are:
- Rem Slot # (Entry Window frequency control only)
- Soft Win # (on-screen rig control)
- K3 Term on COMn (supports K3 terminal mode, K3/0 and K/Mini. Works only for a K3 on both ends)
- USB (not available at this writing)
Rem Slot #, is the simplest. It makes the rig on the remote slot available to an Entry Window at the control site, but provides no other way to control the rig. The usual Entry Window rig control functions are available: type a number into the CALL window and ENTER, or use the minus key to set split. This setting is also the supported way to enable an SO2V Entry Window at the control site for a remote rig (like the K3) that WriteLog supports for SO2V.
Soft Win # provides an on-screen control panel for the remote rig. Buttons control the rig’s mode. With the mouse cursor over the VFO frequency displays, the mouse wheel will tune the remote rig. WriteLog control site supports some rigs more than others. It always can set the radio’s frequency, mode and split. For some radios we have built more full-featured software front panels.
K3 Terminal on COMn is supported only for the configuration of a K3 at the remote site, and a K3 terminal mode device (a K3 in terminal mode, or a K3/0 or K3/mini) at the control site. In this mode, WriteLog puts no extra windows on the screen.
USB requires RC1101 hardware device that provides knobs, buttons, and rig front-panel readouts.
The Rem Slot # setting has one very big difference in behavior from the others: it polls the rig at the remote site in WriteLog’s conventional fashion. For the other modes, when a control site connects, WriteLog at the remote site ceases polling the rig and instead expects the control site to command the rig to set its state. For the Rem Slot # setting you may turn the knob at the remote and see the effect at the control site. For the other settings, turning the knob at the remote will not be seen at the control site.
In my example screenshot, I have arranged for my K3 to be controlled at the control site by a USB front panel there (whose design remains a mystery for now). For the K2, the example sets up to use a software front panel (with very limited functionality.) Slot #3 at the remote is available to an Entry Window at the control site
Control Site Setup/Ports
Once the Control Site connection is established, the rigs you chose to make available at the control site now appear in Setup/Ports at the control site as drop-down options in the COM port column. The Control Setup is repeated at the top of this picture, with the control site Setup/Ports below it.
Try to remember that any future changes in this Remote WriteLog rig slots group, will require you also repeat the Setup/Ports and the Entry Window Radio button setup aftewards.

Once the Control Setup Connect button has completed successfully, you may bring up Setup/Ports at the WriteLog Control site as shown here.
Under Rig Type there is a WriteLog Remote type of “rig”. In what normally is the COM port selector column now are the selections you left checked ON at the previous step. In this example, I had three checked slots in the top dialog, so there are three drop-down selections in the COM column. Consistency would dictate selecting the same three items, top to bottom, as you did in the previous dialog. But WriteLog does not force you to be consistent. You may scramble the order if you like.
Note what works and what does not work in Setup/Ports here on the control site. All the CW and DVK settings are disabled. The control site gets whatever CW and DVK are setup at the remote and you cannot change that here.
It might be surprising to notice that normal COM port and Rig Type selections are allowed here along with the control site specific WriteLog Remote options. If you have a rig that has a remoted front panel and that presents a virtual Com port at the control site, here is where you set it up. Another example is that a FlexRadio at the remote should be configured here at the control site the same as if it were local, and any connection the remote site might have to the same FlexRadio need not be undone, but neither should it be remoted or used here.
In my example, the top slot is SN3, which is the USB control panel connected across to my K3. Soft win 2 is remoted to the K2. The third slot is not yet configured. I’ll set it to Remote Slot 3 to be the SO2V connection to the K3.
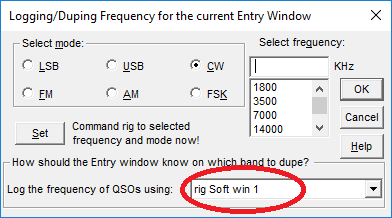
Click on the Radio button on the Entry Window and set the “Log the frequency” button to the appropriate slot.
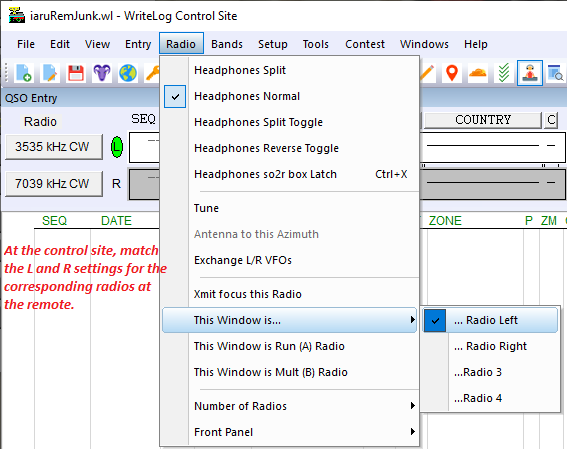
At the control site, match the L and R settings in effect at the remote.
Can’t seem to get the remote control setup 2 to work. If I use Softwin1 it opens window that has the correct info on it. i.e. 14084.43 and RTTY which is that the radio is displaying. The remote side shows Radios in use by control side.
Doesn’t seem to be a way to save that setting.
The “WriteLog Control Site” setup window entries are saved when you “Connect”.
The assignment of control site Entry Windows to those remote rigs is set in Setup/Ports along with the Radio buttons next to their Entry Windows and are saved using Setup/Save-Configuration