
Internet Logbook
WriteLog 10.34 introduced networking via the internet. This feature allows multiple stations to merge their logs in real time over the internet.
This feature was first used by the Central Texas DX and Contest Club under callsign W1AW/5 in the 2002 running of the IARU championship. As thunderstorms rolled across the state, the band assignments hopped from one station to another outside the reach of the lightning in real time without any down time on any band.
Setting up an internet logbook server
The Writelog Internet logbook connects to a server that must be installed on the internet. Most normal Internet Service Provider connections that you would have in order to access the internet from your shack do not provide the necessary support. Setting up the WriteLog internet logbook server takes some special expertise. So if you want to setup such a logbook, and you don’t understand the terms here, then you’ll need to find someone who does.
Stand alone internet logbook server
Download this kit to install the stand alone internet logbook server:
http://github.com/w5xd/WriteLogInetServer.
Connecting to an existing internet logbook server
Each station participating in the multi-multi need only have a connection to the internet. WriteLog can use that connection to send and receive logging information with a server, which is also on the internet. The server is a separate software package, as described above.
A WriteLog user at one of the stations need know this about the server:
- the server’s URL
- his username at the server
- his password at the server
To participate in an internet multi-multi, you will need to get those three pieces of information from the person who’s server you are using. When you select WriteLog’s Tools Connect to Internet Logbook menu entry, it asks for for this information with this box:
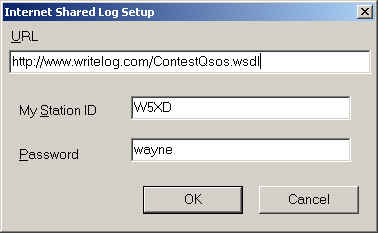
The URL is exactly the same tool that internet browsers use to find web pages. You can use this fact to test whether the server is up by typing the same URL into your web browser. The document at the internet multi-multi server’s URL is displayable by a normal browser. The information you will see requires knowledge of the SOAP protocol to interpret, but being able to load it into your browser confirms you have an internet connection to the server.
The “My Station ID” entry is whatever the server’s manager tell you it should be. The convention is that the home station callsign is used for each station participating in the multi-multi. Note that this is case sensitive. You must enter the Station ID exactly as the server expects, including upper and lower case. The same goes for the password.
Once you click OK, WriteLog begins repeating all your QSOs to the server you connected to, and it will log any QSOs on the server. This process is not particularly fast. If the connection is working, WriteLog silently does its job as the internet bandwidth allows. if WriteLog finds a problem with the initial connection, it should do so within a minute or so, and it pops up a box indicating what its problem is, and what you might be able to do about it. Note that WriteLog silently deals with loss of communication with the server, and picks up again when the server reappears on the network.
Using WriteLog’s LAN networking in conjunction with the internet multi-multi features
Any station participating in the internet multi-multi can itself have multiple PCs interconnected on a local area network (LAN). In order to consolidate the internet communications traffic from all of the local PCs at a station, only one of the PCs at any one station should be designated to connect to the internet and be the repeater for all the other local PCs. That designated PC should be the only one that does the Tools Connect to Internet Logbook menu command as described above. To interconnect the PCs on the local network, use WriteLog’s networking software commands, which are found under WriteLog’s Setup menu. Those commands are documented in WriteLog’s help files, but here is a summary. All the PCs at the station, including the one connected to the internet, must do a Setup Register To Accept Network Connections, which looks like this:
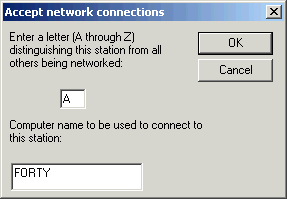
Note that the “Computer name” is not related to the StationID described above. Instead, it is the name assigned to the PC on the LAN by the LAN’s network administrator.
All the interconnected PCs on the LAN must choose a unique letter. This limits the number of PCs sharing a common WriteLog log to 26 on a LAN. But that limit applies only to the LAN. Letters can be reused on the different LANs that are, in turn, interconnected via the internet multi-multi connection.
But because WriteLog has tools for sorting out QSOs by network letter, it will be advantageous later on if you arrange for all the PCs on your internet multi-multi that will be logging QSOs to choose a unique letter in the entire internet multi-multi. If two different stations do share the same letter, WriteLog will successfully log their QSOs (their StationID’s are different from each other), but all the QSOs logged by both PCs sharing that letter will be displayed together in WriteLog’s View by Network Letter view.
At a given station with a LAN and multiple PCs connected this way, the same PC that is designated to be the only one to do a Connect to Internet Logbook should also be designated as the server for the locally connected PCs on the LAN, per WriteLog’s documentation about LAN networking. This simply means that the designated PC does both the commands documented above: Connect to Internet Logbook, and Register to Accept Network Connections, but does not do the next command: Setup Link to Network.

All the PCs on the LAN, except the one designated as the internet server, should do this command, and all of them name the server in the “computer name” type in.
Installing SOAP support
This section applies only to WriteLog version 10. Version 11 and beyond have built-in SOAP support.
WriteLog version 10.29C or later is required. And Microsoft’s SOAP libraries are also required, but not included in the WriteLog installation. All the links below are to the Microsoft web site.
Download and install the SOAP toolkit from here: SoapToolkit20.exe. (Click here to view the Soap Toolkit documentation.) Run the SoapToolkit20.exe. When it offers you the option for a Custom installation, choose Custom . The other options won’t hurt anything, but eat up a few megabytes of disk space you won’t need. Minimize the wasted disk space by filling out the selections this way:
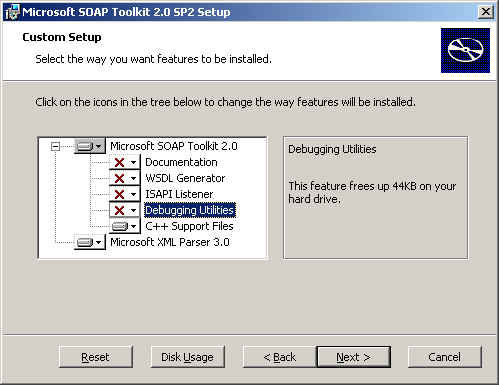
To turn them off, you have to click on those first four options, Documentation, WSDL Generator, ISAPI listener, and Debugging Utilities, which displays as a red X. Keep the C++ support files and the XML parser.