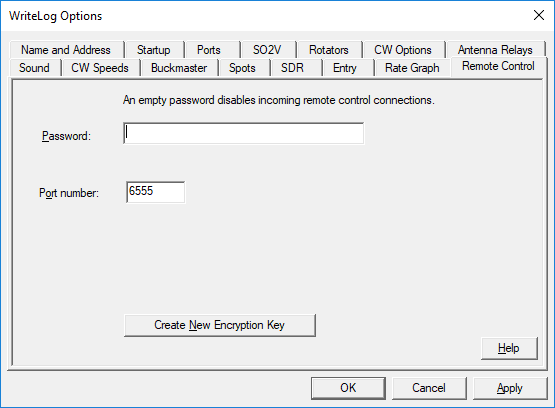
The first step to setting up remote control is to use the Setup/Remote-Control menu entry at the remote site.
Two definitions are required to understand the documentation for WriteLog Remote Control.
- The remote site is the one being remotely controlled. It has radios and antennas.
- The control site is controlling the remote station. It must have a network connection to the remote.
Using WriteLog Remote Control requires an installation of WriteLog on both ends of the link. (The only supported configuration is using the same WriteLog version on both ends. Other combinations might work.)

There are three items here that must be available at the control site when its time for the control site to connect.
- The password. The control site must supply this password in order to initiate remote control.
- The encryption key and certificate. The control site will confirm its copy of the remote’s public certificate file .
- The Port number.
The password is used by the remote WriteLog site to verify that the control site is allowed to connect. The public key is used in the other direction; to verify for the control site; When you type in an internet IP address at the control site, the public key is verified that is in fact connected to the remote site that assigned him the password. These two items together give each end cryptographic assurance that the other end is who they think.
WriteLog ships with no encryption key and remote control disabled. The remote site must generate one using the Create New Encryption key button. That process requires no input, but can take several minutes. One of the files that is created, labeled public, must be copied to the control site to be used to login. WriteLog does not automate the copying process. You have to figure out a way to get the certificate and password to the control site. Use a USB key or a file transfer. Hint: if you use email, zip the .crt file into a zip file first! This is because email programs will do special, undesired handling of .crt files—do not install them. Doing a new Create on the screen above of course disables all existing control sites until they replace their key with the new one.
Additional Security Settings
The above is how WriteLog authenticates that the participants on the two ends of it links are who they say they are. In order for those two ends to even send internet messages to each other, there are intervening authorities that you are going to have to satisfy. There are at least two to worry about.
- Windows Defender Firewall, which I shorten to “Windows Firewall” or simply “Firewall” in the discussion below.
- Your remote site PC is likely not connected directly to the internet, but instead through a router device. That device must be configured to route WriteLog’s traffic through.
Both the above, by default, do not allow applications like WriteLog to communicate. Each has to be individually configured to allow WriteLog through. WriteLog Remote Control is designed to need very little privilege at its control site—it only requires out-going TCP connections on an arbitrary port number—but at the remote site, the Windows Defender Firewall and your home router must be satisfied.
Firewall and router settings
WriteLog’s remote control port number setting defaults to 6555. That number is arbitrary, but cannot conflict with other internet-connected applications you might have on your PC or routed through a home router. If you must change it, it is recommended in the range from 1024 up to 30000. Note that changing this number from the default 6555 will also require a Windows administrator at the remote site to adjust Windows Firewall settings to allow WriteLog to pass traffic on those port numbers. The WriteLog installer sets the Windows Firewall up only for its default 6555 setting. To use a different number, you need a Windows administrator.
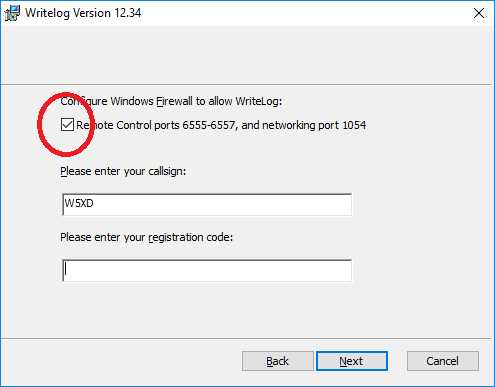
Here is the installer check box. Turn on the circled check box at installation time to make the WriteLog installer set the appropriate Windows Firewall port settings. This setting is critical for the WriteLog install at the remote site. WriteLog’s Control Site does not need Windows Firewall openings to work, although leaving this check box off on the control site install might block WriteLog from optimizing audio transfer with UDP.

Its OK if you did not set that check box the last time you installed WriteLog. Just install it again, the check box appears again. Change it and click Next in the wizard and continue on through the installation process. Because the Windows Firewall silently discards connection requests that it does not allow, the error messages for incorrect settings appear only at the control site and only say that the remote could not connect. The messages give no hint that the connect process made it all the way across the internet to the remote machine, only to be rejected at the PC running WriteLog at the remote site.
Router settings
At the remote site, your station almost certainly has some sort of dedicated hardware for connecting to the internet (e.g. a DSL modem, or cable modem, or fiber modem.) That hardware also almost certainly has the capability to allow incoming internet packets to be forwarded to a PC at the remote site. Each hardware manufacturer has its own way to set up such port forwarding. See your router’s documentation for details. Here is a link to a site that tries to explain the concept.
https://www.howtogeek.com/66214/how-to-forward-ports-on-your-router/
TCP versus UDP
The short answer is to just set your router to port forward both TCP and UDP for 6555 through 6557. If you want to completely minimize the forwarding of internet packets at the remote, you can be a bit more restrictive. Read the rest of the section to understand how.
The primary port protocol is TCP as opposed to UDP. (You only need care about the difference because your router firewall is going to show TCP separate from UDP. Its TCP that you’re needing to set for WriteLog.) The plus-one port number is used for the audio connection. If you want to run WriteLog Remote Control for RTTY, also set up the port number plus 2 to also be forwarded to the WriteLog remote PC.
WriteLog version 12.34 and up can alternatively use UDP for remote audio, and version 12.51 and up can use UDP for Band Map waterfall data. There are certain technical advantages for UDP compared to TCP for streaming audio, but UDP and TCP are separate network administrator set ups. WriteLog uses the same port numbers for its UDP as it does for TCP, just set your router to forward both UDP and TCP for ports number 6555 and 6556. Again: WriteLog requires the designated TCP ports be open and will optionally also use UDP ports 6555 and 6556 if it discovers UDP packets will make it across as well.
In summary: set your remote site router to forward TCP 6555, 6556, and 6557 to your shack PC, and also forward UDP 6555 and 6556.
WriteLog Remote Control must have TCP 6555 to do anything at all, TCP 6556 to transfer audio (in both RX and TX directions), and TCP 6557 for RTTY modems. UDP audio also requires UDP 6556.
At the control site, no special firewall settings are required. You should be able to operate a WriteLog control site on your laptop at your local coffee shop or library wifi unless they have blocked these required ports from outgoing traffic.
Dynamic DNS
Your control site (or control sites) need a way to find your remote site on the internet. There are multiple ways to make this happen. One is to use what is called “dynamic dns.” Using dynamic DNS requires you to subscribe to a service provider that publishes your remote site internet address. I use http://noip.com. There are others.
And that is all the WriteLog setup to be done at the remote. All the remaining setup items, and there are more, are at the control site.
It is also likely you’ll need the control to be able to access general Windows Desktop functions at the remote. WriteLog does not provide that. Try http://teamviewer.com, https://www.tightvnc.com/, https://www.gotomypc.com/, or http://realvnc.com or similar.
