Contest logging software for winning CW, SSB, RTTY, and PSK31.
|
|
|
|
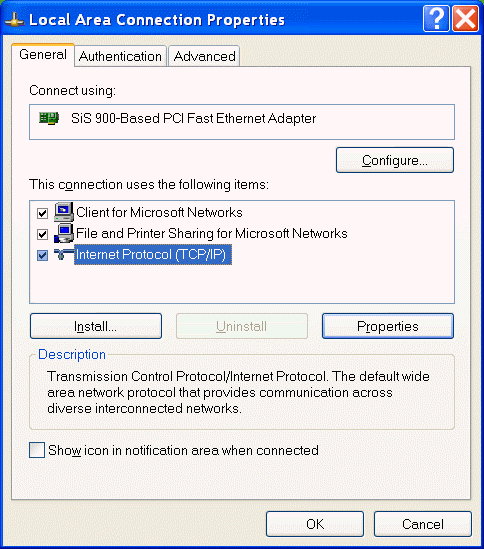
Network Setup for XP The WriteLog installer does not consistently setup everything necessary for WriteLog networking to work properly on Windows XP. Here are some instructions you may follow to get networking going when the normal path doesn't work. These instructions also worked unchanged for Windows 2000. The Protocols The WriteLog help files describe how to install NetBEUI in order to get networking going. NetBEUI is not necessary for WriteLog networking (nor is it included in a normal Windows XP install). These days, virtually every computer is set up to run TCP/IP networking, and it will support WriteLog networking. You also must install and enable the Windows networking components "Client for Microsoft Networks" and "File and Printer Sharing for Microsoft Networks". Use the Windows Start Menu, Settings, Network and Dial Up Connections menu to get to the window showing your "Local Area Connection". Right click that icon, and select Properties to bring up this dialog box.
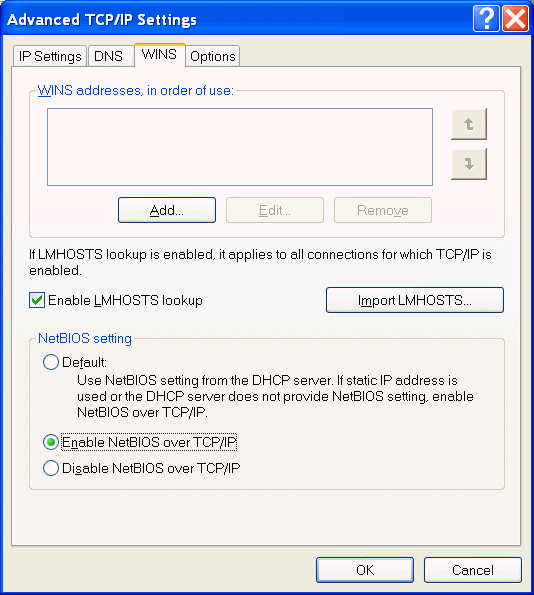
If you do not have any of the three items above, then use the "Install..." button to get them. If you have additional entries, they do no harm. If you have installed NetBEUI for the only purpose of getting WriteLog networking, then you may Uninstall it now. Enable NetBIOS over TCP/IP In the window above, highlight TCP/IP, and click Properties. Click the "Advanced..." button to bring up the "Advanced TCP/IP" dialog, then go to the WINS window and make sure that NetBIOS over TCP/IP is enabled:
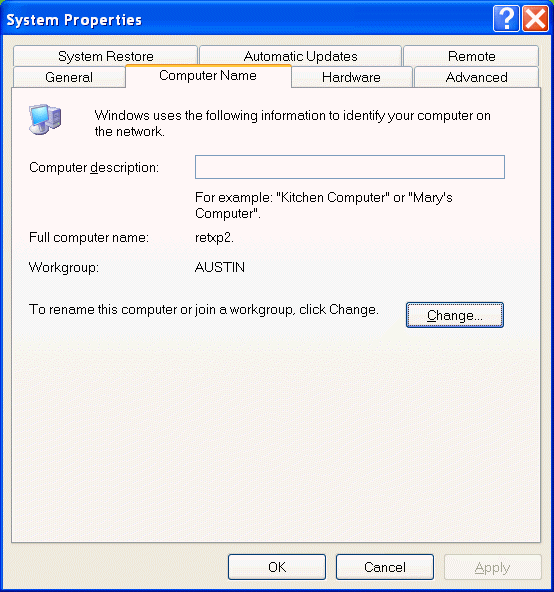
In my own network, I use the "Default" button instead, because I have a router that assigns DHCP addresses. But the "Enable" button as shown is necessary if you are using static IP address assignments. Also, if you are using static IP assignments, you probably have to edit the lmhosts file on each machine. On a network with a DHCP router, I did not have to edit lmhosts. Put all workstations in the same WorkGroup On the Windows desktop, right click the My Computer icon, and select Properties. Go to the "Computer Name" tab, and use the "Change..." button if necessary to make sure that all your workstations have the same Workgroup entry. Keep the workgroup name to 6 characters or less, and use only capital letters and digits. In this example, I used "AUSTIN". The "Full computer name" entry must be different for each machine.
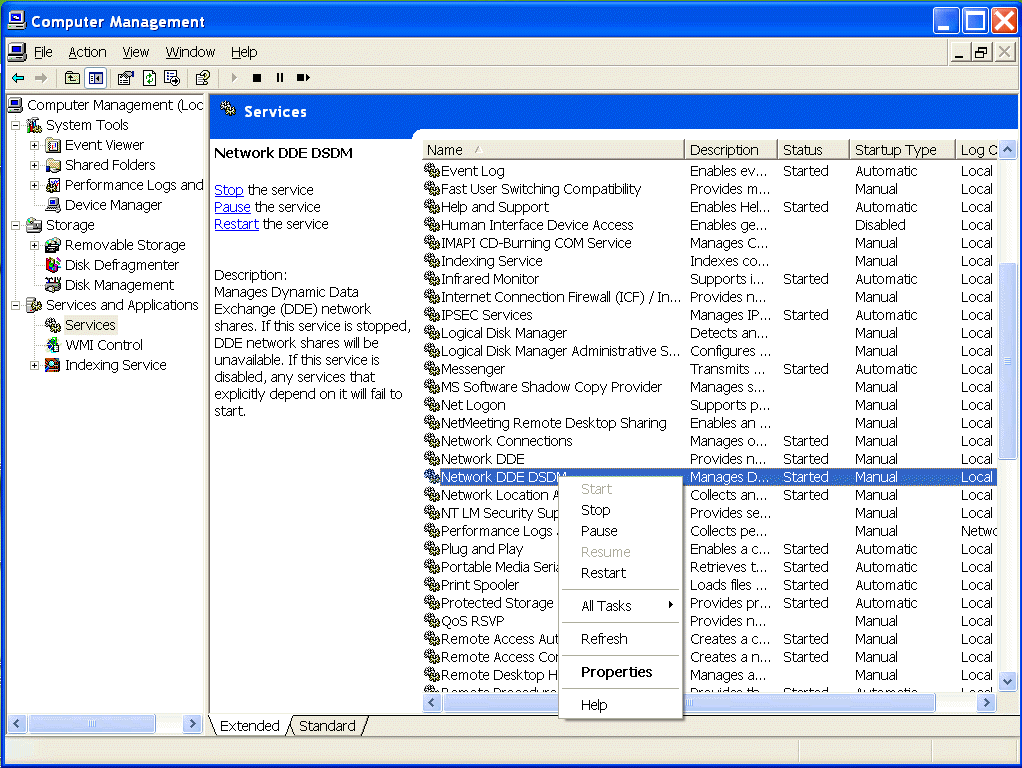
On Windows 2000, the tab has a different name: "Network Identification", but it has the same entries. Note: if the WriteLog network includes Window 98 machines, then the "Full computer name" must be limited to no more than 6 characters, all UPPER case with no space characters on ALL machines in the network. After you OK all the above dialogs, the machine may demand a reboot. Even if it does not demand, if you made any changes in the above dialog, I recommend a reboot anyway. Now check that the "My Network Places" icon, the "Entire Network", "Microsoft Windows Network", and your group name ("AUSTIN" in my example screenshots) on all the computers all show each other. On each machine you should share a folder (in Windows Explorer, right click the folder to share, and select "Sharing" in the menu). And all the other machines should be able to list the contents of the shared folder on all other machines. Create an identically named user account with identical (nonblank and ALL CAPITAL) passwords on each workstation. Keep the user name and password to 6 characters. On Windows XP Home, use Settings, Control Panel, User Accounts to create a new user. Do not leave the password blank, and use all capital letters. On each machine in the workstation, create the exact same user name and password. (On Windows 2000 only, you create users with a right click on the My Computer, select Manage, and also add any newly created user to the Administrators group). Rerun WriteLog's Network setup manually This step was done by the WriteLog installer. But it might have failed. So its a good idea to just run it again. Create a command window by using the Start menu, Run.. entry, and type in "cmd" and <ENTER>. In the window that comes up, set your default to WriteLog's \programs directory. Then run WriteLog's NetsetupNT.exe program. You should see something like this: D:\WL10>cd \ham\programs Restart the NetDDE services On the Windows desktop, right click the My Computer icon and select Manage. Brows to the Services & Applications, Services tab, and scroll until you see the two entries in the right panel starting with NetDDE:
Login Make sure you are logged in on each of the workstations on the account/password combination that matches among all the workstations. Now WriteLog networking should work among all of them. |
|